Materials List:
- Hero Arts Hero Hues 111# Cardstock – Pitch Black
- Watercolor Paper – 140# coldpress
- Layering weight White Cardstock
- Gina K Designs – Doodled Autumn Stamp Set
- Trinity Stamps – Embossed Edge Circle Stack
- Superfine Black Embossing Powder
- Tim Holtz-Ranger Distress Spray Stain- Lumberjack Plaid & Forest Moss
- Tim Holtz -Ranger Distress Mica Stain- Harvest Moon
- Lawn Fawn – Just Stitching Double Circle & Double Rectangle Dies
- Waffle Flower – A2 Layers Dies
- Wow! Metallic Embossing Powder – Copper
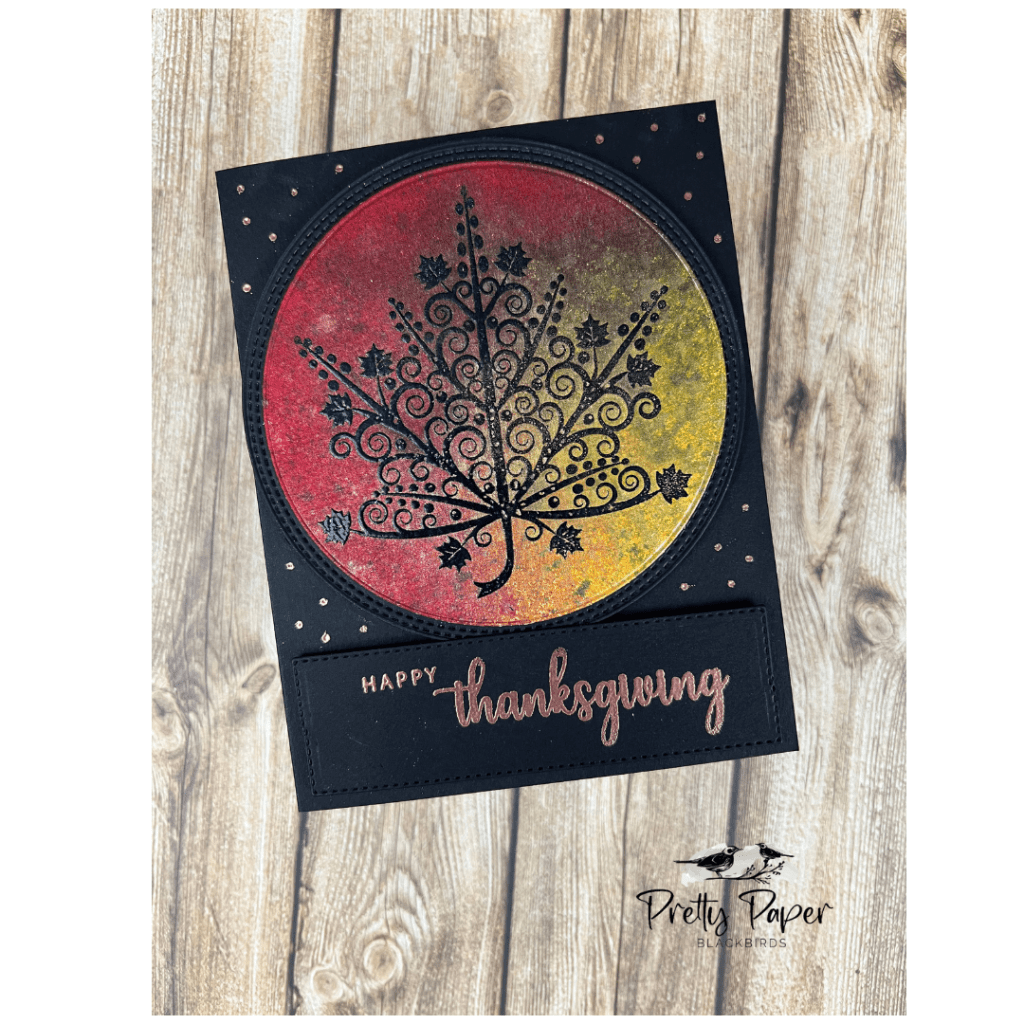
In the last video I featured a greeting from the Gina K Designs Doodled Autumn stamp set and I fell in love with the very ornate leaves in the set. I have been playing around with designs using these leaves and I am so happy with this final design. The black card stock used in the base really helps to pop out the bright fall colors and give depth to the maple leaf image.
The image is stamped with embossing ink on watercolor paper and then heat embossed with a black superfine embossing powder. A quick trip into the spray box for a heavy application of some spray stains and a mica stain, and the focal image for the front of the card is ready for die cutting.
I used a slightly larger circle die to cut a black background for the leaf image and found a stitched circle embossing die in my stash to create a stitched border around the image. The greeting is also from the Gina K stamp set but I was short one appropriately-sized die to cut this to size so I had to employ a well-known “die stretch” hack to cut this greeting. Here’s how it works. Find a die that is the appropriate width for your greeting or sentiment. Line up the die at the top of the greeting in the correct position and tape it down to the paper. To die cut, place the paper and die at the bottom of the cutting plate so that only the top portion of the die is on the plate. The part of the die that extends off the plate (the bottom portion of the die) will not cut. Run the paper through the die cut machine to complete the top part of the cut. Now, remove the die and line it up at the bottom of the greeting, taking care to align the edge of the die with die cut edge of the paper you just cut. Tape it down to the paper and position the paper and die at the bottom of the cutting plate so that the bottom of the greeting is on the plate (the part you want to cut) and top of the greeting hangs off the bottom of the plate (the part you don’t want to cut.) Run this through your machine a second time and you now have a perfectly cut greeting!
I heat embossed the greeting with a metallic copper embossing powder, then popped up the leaf image and the greeting on the front of the card using foam tape. To ease the foam tape around the perimeter of the circle you can cut small snips along the edge of the tape, much like you would ease a seam allowance for a sleeve or neckline (if you sew, you get this!)
The final step for the front of the card involves a ball stylus. (I used my scoring tool from my scoring board because this blog is about STRETCHING SUPPLIES!) I used the stylus and embossing ink to create small dots and then applied embossing powder. I used the same embossing powder that I used in the greeting and then heat embossed these dots.
The final step is to create an insert for the card. I like to create inserts when using a dark cardstock for the card base. For this insert I used one of the smaller leaf stamps (I’m calling this a beech tree leaf) to stamp a small leaf in the bottom left corner, then I used an A2 frame die to cut the panel down to 3 3/4″ x 5″. I used another double-stitched embossing die to emboss just inside the cut edge to give the panel some pizazz, and then adhered the panel to the inside of the card.
Easy peasy! And the colors just shimmer on the black card stock!
Well, it is snowing here in Indiana today and this really puts me in the mood for some wintery cardmaking. Stay tuned for holiday cards, tags and possibly a table setting in the coming days!
Cheers!
Cynthia