Uncategorized

Snowflake Layers! So Versatile!

Materials List:

  • Trinity Stamps Big Snowflake Foiling and Die Set
  • Simon Says Stamp! Christmas Blessings
  • Honey Bee Stamps Snowfall Background Stencil
  • Distress Mica Stain – Shiny Bauble
  • Picket Fence Studios – Paper Glaze, Winter Snowfall
  • Spellbinders Glimmer Foil – Moondust & Speckled Prism
  • Ranger/Wendy Vecchi Archival Ink – Watering Can
  • Tim Holtz/Ranger Distress Crayon – Brushed Pewter
  • Altenew Pigment Ink – Sapphire
  • Wow! Superfine Embossing Powder – Metallic Silver
  • Versamark Embossing Ink
  • Watercolor Paper – 140 Coldpress
  • American Crafts glitter cardstock – white
  • Recollections Music Stamp

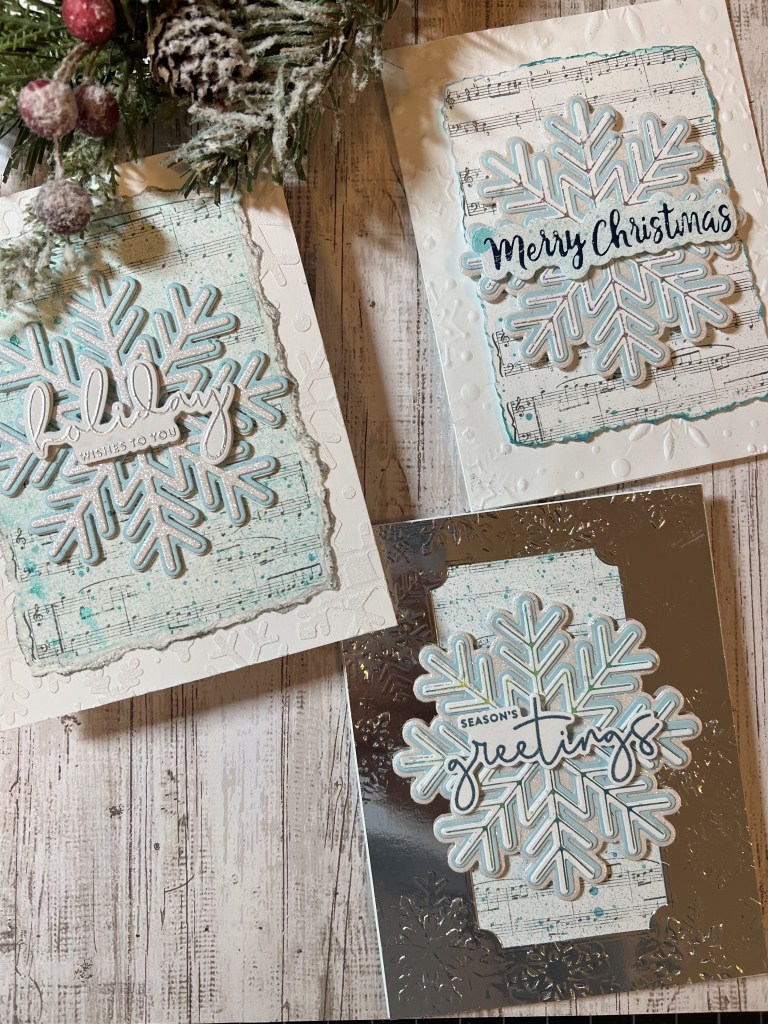
In my last video and post I gave huge props to the Trinity Stamps Foiled Pine Foiling and Die Set, and guess what? There is a snowflake set as well! Those designers were hard at work for the holiday season in 2022! For this card I pulled out the Recollections music stamp again (because it is gorgeous!) but used some Shiny Bauble Distress Mica Stain and some Distress Crayons to accent the music layer. I made three versions of the card. Here are the details…

Card #1: For this card I wanted to bring back an old favorite – Picket Fence Studios Paper Glaze in Winter Snowfall. This stuff is magical. I used the Honey Bee Stamps Snowfall Background Stencil to stencil on the snow with the Paper Glaze. While the background was drying I moved on to the music layer. I used the Recollections music stamp from the last post to stamp the music image on 140 lb cold press watercolor paper using archival ink in Watering Can. I tore off the edges of the paper down to the outline of the music stamp, then I very lightly misted with Distress Mica Stain in Shiny Bauble. Once the ink was dry I ran the edges of the paper through a small amount of Brushed Pewter Distress Crayon mixed with a small amount of water. This really helps to delineate this layer. For the snowflake layer I die cut the largest snowflake three times: once on light blue layering weight cardstock and twice more on white layering weight cardstock. I stacked and glued these three layers for dimension. I then cut the smallest snowflake from white glitter cardstock (the pressed kind, no mess!) I glued this layer to the blue base layer. On to the greeting. For this card I chose the “Holiday Wishes to You” greeting from the Simon Says Stamp Christmas Blessings stamp set. I stamped the greeting with clear embossing ink, applied silver metallic detail embossing powder, heat set, then die cut the greeting. To assemble the card I adhered the music layer to the card base with a strong adhesive (I love Tombow multi) and then adhered the snowflake in the middle of the music panel using the same adhesive. I used tiny foam squares, some of them I cut into two slivers, to pop up the greeting in the center of the snowflake. Card 1 complete!

Card #2: For the second card I used a snowflake 3D embossing folder for the front panel background. I created the music panel exactly the same way as in card #1, with the exception of the edge treatment on the panel. I used the Shiny Bauble Mica Stain for this step. The snowflake was created in two layers. The bottom layer is cut from white craft foam using the largest snowflake die, and the top layer is cut from layering weight light blue cardstock using the smallest die. I used the foiling plate and Spellbinders Hot Foil in Speckled Prism to hot foil an accent on the top snowflake. The greeting is stamped and cut from the same Christmas Blessings set, but stamped in Altenew’s Sapphire pigment ink. The card was assembled the same as card #1. I used strong adhesive for all layers.

Card #3: I wanted a little more flash on this card so I went with an embossed silver metallic frame for the front panel. I cut the center of the panel using Momenta’s Ornate Frames, 3rd largest frame. I centered the opening on the card base with the music panel showing through the opening. The base layer for the snowflake is the same light blue cardstock which was adhered to two additional layers of white cardstock cut outs. The hot foil on this snowflake is Spellbinders Moondust (lovely color!). The greeting is stamped in Distress Oxide in Uncharted Mariner and all layers of the card were adhered with strong adhesive.

The snowflake die was very versatile, cut fabulously and is the perfect size for an A2 or larger card. The cards came together quickly and easily. I’ll enjoy sending these to friends and family this season.

Cheers!

Cynthia

Uncategorized

Create a Mixed Media Holiday Look with Simple Card Making Techniques!

Materials List:

  • Trinity Stamps Foiled Pine Foiling Plate & Die Set
  • Hero Arts Joy Stamp & Die Set
  • Hero Arts Hero Hues 111# Cardstock – Cranberry
  • Distress Spray Stain – Antique Linen
  • Distress Oxide Inks – Rustic Wilderness, Tumbled Glass, Vintage Photo
  • Spellbinders Glimmer Foil – Aura
  • Ranger/Wendy Vecchi Archival Ink – Potting Soil
  • Liquitex – Crackle Paste

Reboot! For the record, I completely reworked a card that I posted here a few days ago. It was one of those cards…one where you like it but you don’t LOVE IT and it sort of sits in your thoughts until you go back to the craft table and take another look at it. The result is a lighter feel, cooler colors and a cool crackle paste/antiqued music layer that I really love.

This card was inspired by so many beautiful holiday mixed media Pinterest projects – I spent my design day trying out some techniques and adapting them to typical card making techniques. The result is this card of layered, stamped and embossed goodness. I am so enthralled with background stamping, covered by layers of semi-transparent ink and stenciling. Watch for many cards in the future that showcase these techniques. Meanwhile, check out the video for this card here.

I started with the top layer of the card (the tree layer) with 140# cold pressed watercolor paper. I created an ink puddle on my glass mat with Distress Oxide inks in Tumbled Glass and Rustic Wilderness. I pressed the watercolor paper into the ink (systematically?) to create the first layer of color. The Tumbled Glass acts as a highlight behind the darker Rustic Wilderness so this ink was applied sparingly. After drying this first layer I inked up the mat again with only Rustic Wilderness and a small amount of water to create a darker top layer of color. The idea here is to create a pattern of color that is the background for the foiling of the branches on the pine tree. This will make much more sense when you watch the video!

The next step is to die cut the tree shape with the included outline die. I lined up the outline die on the inked piece until I found just the right view and then ran the paper and die through my die cut machine. Next I created a foiling stack for my Glimmer machine using Spellbinders Aura Glimmer Foil. This foil is beautiful! In the video I describe it as a cross between gold and silver foil but more accurately it is a cross between gold and iridescent foil. I ran the stack through my die cut machine and the result was truly stunning.

Next I worked on the deckled edge paper for the music and embossed layers of the card. I traced faint pencil lines for two panels: 4 1/4″ x 5 1/2″ and 3″ x 4 1/4″. I used a deckle edge ruler to tear the paper along the pencil lines.

Using the smaller deckle edge paper I stamped the music block stamp onto the paper using Archival ink in Potting Soil. I then added a layer of Crackle Paste and allowed the piece to dry. Once dry I antiqued the panel by spraying lightly with Distress Spray Stain in Antique Linen, then used the Distress Oxide ink pad in Vintage Photo to lightly ink the edges and a few raised spots on the face of the panel. Panel complete!

The bottom layer starts with the 4″ x 5 1/4″ deckle edge panel. I inked up a “frame” on the front of the paper using Rustic Wilderness ink, heat-dried the ink, then applied a layer of embossing ink using an old ink pad that gets a lot of abuse. I applied clear embossing powder then heat set the powder. I repeated the embossing ink/embossing powder steps once more. So easy but so much shine to this layer!

For the greeting I chose Hero Arts’ Joy stamp and die set. The large greeting and die are perfect for this card. I chose a cranberry cardstock for the greeting and cut the “Joy” word three times for layering. I stamped the words “Tidings of comfort &” on cranberry cardstock, applied embossing ink and white embossing powder, then heat set. I cut the greeting into a banner shape. Whew! Finally all elements are ready to assemble the card.

For a card base I used a heavy white cardstock cut to 5 1/2″ x 8 1/2″, scored at 4 1/4″. I folded and pressed the scored edge and used a strong liquid adhesive to apply the glazed layer to the card base front. I did not apply adhesive near the edges of the glazed layer as I really love how this layer has so much dimension and curls up slightly on the edges. This adds to the mixed media look that I was going for with this card. I then added the music layer in the center of the glazed layer. The last layer, the tree was applied using foam squares for even more dimension. I finished off this card by adhering the greeting strip and “joy” die cut near the bottom of the foiled tree. I applied the dot over the “j” using a dot of Pops of Color rather than trying to glue together three small dots.

I really love the look of this card and am working on a snowflake version that might make it to video. So many ideas, so little time.

Cheers!

Cynthia

Uncategorized

Stretch a Holiday Card Kit – Gift Tags!

Materials List:

  • Hero Arts Make Yourself at Home November 2022 Card Kit
  • Copic Markers: R59, R37, R21, G28, G24, YR14, E99
  • Picket Fence Studios Paper Glaze – Winter Snowfall
  • Simon Says Stamp! Acetate Sheet
  • Detail White Embossing Powder
  • Tim Holtz-Ranger Distress Mica Stain – Tart Cranberry & Brushed Pewter
  • Tim Holtz-Ranger Distress Oxide Ink – Rustic Wilderness
  • Scrapbook.com Pops of Color – White Satin
  • Lawn Fawn Stencil Paste – Gold
  • Vellum
  • Sizzix 3D Sweater Embossing Folder
  • Momenta Ornate Stacked Frames Dies
  • Lawn Fawn Circle Stitched Tags
  • Gina K Holiday Tapestry Stamp Set

After making lots of cards with the Hero Arts/Joann Make Yourself at Home November 2022 card kit I decided to stretch the supplies even further and create some coordinating gift tags. This kit delivers on possibilities! I was able to create several tags using just the elements in the kit and it was fun to go through my stash to find tag dies to die cut everything to size.

My favorite tag is the green 3-D poinsettia that pops off the tag with gold embossing, a spray of brushed pewter mica spray and some Pops of Color dots. I heat embossed the sentiment with white detail embossing powder and inked the edges of the tag with Distress Oxide ink in Rustic Wilderness. I used foam squares to pop up the top layer of the poinsettia and curled the edges of the leaves just a bit. The colors in this tag feel so holiday-ish and I really love it.

The simplest tag (by far) was the sweater texture tag. I cut two tags to size with a tag die, misted one lightly with water, placed it in a 3D sweater texture embossing folder and then ran it through my die cut machine. I stamped “To:” and “From:” on the second tag and glued the second tag on the back of the embossed tag. This is one that can be mass produced very quickly in various colors and it is super cute.

And of course I had to use the poinsettia stencil again. I loved this textured background in the original series of cards and I knew I wanted to use it again on the tags. I stenciled both the cranberry and pine cardstock with the stencil and paper glaze, cut the tags to size with a tag die and then created various overlay layers with vellum or white cardstock for the “To:” and “From:” stamps. I had so many ideas for this background…Have you ever had so many ideas that you just know you can’t possibly remember all of them? Yes, that happened.

The acetate overlay is also very simple but feels so Christmas-y. I used an anti-static powder tool on both sides of the acetate die cut, then inked with embossing ink and applied detail silver embossing powder. This is heat-resistant acetate from Simon Says Stamp! but make sure your heat tool is primed (turn on for about 20 seconds before you start to heat emboss) for quick results with absolutely no warping!

There are other tags in the photos above that I haven’t detailed so drop me a line if you’d like more information. I hope you are able to use this info to stretch your supplies a little bit further and also create some fun and useful gift tags in the process. My next project is a gift box and gift card holder using patterned paper from your stash. Stay tuned!

Cheers!

Cynthia

Uncategorized

Let’s Celebrate Holiday Card Kits!

Materials List:

  • Hero Arts Make Yourself at Home November 2022 Card Kit
  • XPress IT Blending Card Paper
  • Copic Markers: R59, R37, R21, G28, G24, YR14, E99
  • Picket Fence Studios Paper Glaze – Winter Snowfall
  • My Favorite Things Essential Stitched Sentiment Strips
  • Simon Says Stamp! Acetate Sheet
  • Detail White Embossing Powder
  • Tim Holtz-Ranger Distress Mica Stain – Tart Cranberry
  • Scrapbook.com Pops of Color – White Satin
  • Sakura Glaze Pen

This card kit is a collab between Hero Arts and Joann (yes, the fabric/craft/everything store) and let me just say that I’m pretty certain that anything these two do together is going to be amazing. And I’m not wrong here. This kit is LOADED with crafting goodies – two ink cubes, twine, embossing ink, coordinating colored cardstock, A2 notecards, envelopes, stamps, dies AND a stencil. For $30. Seriously??? Wait, I forgot the gold embossing powder….. It’s almost unreal.

I was so impressed with this kit that I decided to create a video, so I spent the better part of last Sunday playing around with all the glorious cardmaking goodies to see what I could create. I think the photo above says everything. I made four cards and I was so happy with each of them, like, would mass produce any of the four as my Christmas card for 2022. (Okay, maybe not the Copic version because that card took a minute to produce but wow, that stamp is a perfect holiday floral.)

Card 1: This card was the quickest and I love the clean and simple look. I used only elements in the kit for the card, some quick stamping and I tied on the twine with a few loops and a cute bow. I glued a white panel inside the card (also from another notecard in the kit) to hide the twine on the inside and card #1 was complete.

Card 2: This card was my absolute favorite for its classic red and white color scheme and the stunning texture glaze background. I used the stencil in the kit and Picket Fence Studios Velvet Paper Glaze in Winter Snowfall to create the snowflakes on the front of this card. I’m in love with this look and I’ll be using more of the paper glazes in upcoming cards. I stamped and embossed the Peace, Love, & Joy greetings on the cranberry cardstock, applied white embossing powder and heat set. A quick die cut with a MFT sentiment strip die and I was ready to place all these goodies on a cranberry card base. So easy, yet so pretty. My favorite card combo!

Card 3: This card was the most time-intensive but how beautiful is that floral stamp? It begged for Copic coloring. I love choosing Copics and experimenting with blending for florals. I have an entire Pinterest board dedicated to Copic coloring. I’m still new to this and rely heaving on the expert and some of these people are truly visionary when it comes to Copic markers. After stamping the entire stamp and one extra poinsettia; coloring and die cutting, I created a fun and sparkly background using Tim Holtz-Ranger Distress Mica Stain in Tart Cranberry. It’s a perfect mica stain for holiday cards and the shimmer really ups the Wow! factor in this card. I adhered the floral die cut on the panel with some strong adhesive, adhered the panel on the card with Gina K tape runner and then added some pizazz with Pops of Color on the larger berries and Sakura Glaze pen on the smaller berries. That bold “Merry Christmas” stamp really pops with the gold embossing against the Pine cardstock in the greeting strip. The same Pine cardstock serves as the card base and this helps to pull the whole look together in this festive, floral holiday card.

Card 4: For the final card I used a sheet of acetate from Simon Says Stamp! that is heat-resistant, which makes it perfect for heat embossing. I really love the look of an embossed acetate overlay and the green card base and cranberry-red poinsettias behind the overlay shout “Holidays” like no greeting strip ever could. But what about that cranberry and gold-embossed greeting strip that takes center stage on this card? I love everything about this card and it will definitely be in the first string line up of cards I’m sending this season.

Tomorrow I’m enjoying a much needed and long overdue spa day (yay me!) and then on Wednesday I’ll post some holiday gift tags I created from this same Hero Arts kit. Check back here for that post and as always, thanks for stopping by!

Cheers!

Cynthia

Uncategorized

Thanksgiving Place Setting Name Tag (Bonus Project #2!)

Materials List:

  • Wooden Name Tag Holders
  • Layering Weight Cream Cardstock
  • Layering Weight Dark Rust Cardstock
  • Trinity Stamps Maple Leaf Layers Die Set
  • Cricut Foil in Copper
  • Spellbinders Glimmer Foil in Copper
  • Momenta Ornate Frames Die Set
  • Jute Cord

Here is the bonus Thanksgiving project #2 from the Rustic Thanksgiving card series. I used the foiling plate and outline die from the Trinity Stamps Maple Leaf Layers die set to foil and die cut the maple leaves from rust 100# cardstock. I foiled the names with my Cricut using an elegant font without outline, the medium foiling tip and copper foil. I foiled these on cream cardstock and then die cut the name tags with the second largest die. I cut a slightly larger frame from rust cardstock as a background to the tag. My wonderful hubby cut the name tag holders from a branch he pruned (and thankfully saved) earlier this fall. A tiny jute bow completed the rustic look of these name tags and helped to coordinate the look with the place settings. Now that the table setting is complete, time to start on that menu….

Cheers!

Cynthia

Uncategorized

Four Simply Spooky (and quick) Cards! | Halloween Series 2022

Materials List:

  • Hero Arts Hero Hues 111# Cardstock – Pitch Black & Mustard
  • Tim Holtz Halloween Sentiments Stamp Set
  • Simon Says Stamp Gothic Halloween Background Stamp
  • Spellbinders Simply Perfect Layered Blooms Dies
  • Spellbinders Haunted House Die Set
  • Simon Says Stamp! Handlettered Halloween
  • 100# White Overweight Cardstock
  • Parklane Haunted Hollow Patterned Paper
  • Sizzix Clear Embossing Powder
  • VersaMark Embossing Ink
  • Tim Holtz Ranger Distress Oxide – Crackling Campfire, Black Soot
  • VersaFine Clair Pigment Ink – Nocturne

For the third video in my Halloween Series 2022 (check it out HERE on YouTube!) I used a large background stamp and clear embossing to create the base for two simple but striking cards with a gothic look. These cards were very quick and easy to create but have a ton of shimmer and shine.

For the final two cards I also used clear embossing and a black/orange color combination to create two quick and colorful cards that can be recreated using any haunted house stamp set. After all, the purpose of this blog is to find ways to use those stamps, dies and embossing folders that we already own in new and exciting ways. I hope this layout and the gorgeous colors inspired you to go through your stamps and dies and find some elements that you could use to recreate these quick and (mildly!) spooky cards for Halloween.

The final video in this series is coming up next week. I hope you’ll tune in here, or on YouTube for the video.

Cheers!

Cynthia

Uncategorized

Simple, Rustic Thanksgiving Card + Placesetting

Materials List:

  • Hero Arts Hero Hues 111# Cardstock – Chestnut (Card Base – A2)
  • Layering Weight Cream Cardstock
  • Layering Weight Dark Rust Cardstock
  • Layering Weight Tan Cardstock
  • Layering Weight Brown Cardstock
  • Tim Holtz Ranger Distress Oxide – Vintage Photo
  • Trinity Stamps Maple Leaves Die Set (This set foils as well!)
  • Spellbinders Christmas Blooms Die Set ( I used only the pinecone die)
  • Gina K Designs Doodled Autumn Stamp Set
  • Tim Holtz Ranger Distress Embossing Glaze in Fired Brick and Antique Linen
  • Metallic Paper: Copper and Gold
  • Burlap Paper (I found this on Amazon)
  • Tim Holtz Ranger Distress Oxide – Vintage Photo
  • Stitched Banner Die Set
  • Jute Cord
Additional materials for the place setting:
  • Satin Ribbon in Dark Burgundy, 3/8″ wide, approx 12″ length
  • Gossamer Ribbon in Champaign, 5/8″ wide, approx 12″ length
  • Hero Arts Year Round Messages Stamp Set

This project started as an idea for a place setting for our family Thanksgiving dinner and as I was working with the elements for the place setting I realized it would also create a lovely, rustic Thanksgiving card. So there’s a two-for-one bonus with this post!

Check out my YouTube video here for complete instructions to die cut, emboss and assemble this card. The place setting requires only a few additional crafting items and a different, smaller “Happy Thanksgiving” greeting so it is more proportionate with the overall smaller size of the project. I used a small hole punch to punch the holes on each side of the burlap backing paper, then layered the ribbons and threaded them through each side of the backing paper, from back to front. I knotted the ends to create a slight bend in the burlap to give the piece some added interest. You could also tuck your silverware behind this backing for a complete silverware setting!

This was a really fun project to design and create and I love getting additional mileage from my crafting materials. I made several cards to send to my family members whom I sadly won’t be with on Thanksgiving day, but want very much to know that I am thinking of them. If you make this card and/or place setting please drop me a line and let me know how it goes!

Cynthia

Uncategorized

Wicked Good Halloween! +Textured Embossing! | Halloween Series 2022

Materials List:

  • Hero Arts Hero Hues 111# Cardstock – Eggplant (Card Base – A2)
  • PaperLane – Haunted Hollow Collection
  • Layering Weight Craft Cardstock – 4″ x 4″
  • Tim Holtz Ranger Distress Oxide: Villainous Potion, Prize Ribbon, Rusty Hinge, Black Soot
  • VersaFine Clair – Nocturne
  • Penny Black Halloween Gathering Stamp Set
  • Simon Says Stamp! Let’s Spook Up Some Fun Stamp Set
  • Tim Holtz Ranger Distress Mica Stain – Iron Gate
  • Lawn Fawn Stitched Hillside Borders
  • Recollections Square Nesting Die Set
  • Hero Arts Elegant Window Die
  • Tim Holtz Ranger – Embossing Pen
  • VersaMark Watermark and Embossing Ink
  • Ranger Detail Embossing Powder – Black
  • Sizzix Super Fine Embossing Powder – White

For the second video in my Halloween Series 2022 (check it out HERE on YouTube!) I wanted to create a card using some of the techniques I’ve practiced with masking and Distress Mica Stains. These mica stains react with water to create a beautiful bokay effect and this is perfect for a nighttime sky. The giant moon and the pensive little cat on this card make me so happy! I experimented with creating texture with the embossing pen and embossing power and I’m really happy with the final result of bark-like texture on my tree. The additional of some fun wallpaper-like patterned paper and beautiful stamps from Simon Says Stamp! made this Wicked Good Halloween card so much fun to design and create.

I hope you found the textured embossing technique to be fun and useful for your own card making and crafting. Please join me here, or on YouTube for my third video in the Halloween 2022 series.

Cheers!

Cynthia

Uncategorized

Sassy Witch Hat with Fun Gradient Glitter Cardstock! | Halloween Series 2022

Materials List:

  • Hero Arts Hero Hues 111# Cardstock – Pitch Black
  • Altenew Essential Black & White Paper Pack
  • Black Glitter Cardstock
  • Lawn Fawn Giant Trick or Treat Die
  • Simon Says Stamp! Sassy Witch Hat
  • Hero Arts Hero Greeting Halloween Stamp Set
  • Recollections Gradient Glitter Cardstock
  • Copics – V04, V09, V99
  • Tim Holtz Ranger – Distress Oxide Inks: Crackling Campfire, Mowed Lawn
  • Craft Foam – White
  • Foam Squares/Tombow Adhesive

For the first video in my Halloween Series 2022 (check it out HERE ) I combined the Simon Says Stamp! Sassy Witch Hat die set with the large Trick or Treat die from Simon Says Stamp! to create a fun and sassy Halloween card that has lots of glitzy color from the addition of a gradient glitter cardstock greeting. I used three shades of violet Copic markers to create texture and shading on the witch hat, creating the illusion that the hat is worn and crumpled. Copics are so fun and I’ve been fortunate to be able to add to my collection in the last few months.

This card was really fun to make and I went with some creative instinct for the inside insert panel. It is so fun to just create with no preset idea of the outcome. And inside panels are apparently my thing now!

I enjoyed making this fun and sassy card while getting more practice with copic coloring and ink blending. The large die cut and fun gradient colors in the glitter paper give this card so much added color and interest. Please join me here, or on YouTube for my second video in the Halloween 2022 series. I look forward to crafting with you!

Cheers!

Cynthia

Uncategorized

Pumpkin Cottage with Distress Oxide Starry Sky | Halloween Series 2022

Materials List:

  • Lawn Fawn Pumpkin House Die Set
  • Simon Says Stamp! Ghouls and Tree Die Set
  • Lawn Fawn Tea-Riffic Day Stamp Set
  • Pretty Pink Posh Halloween Borders
  • Simon Says Stamp! Handlettered Halloween
  • Hero Arts Hero Hues 111# Cardstock – Eggplant
  • Vellum
  • Watercolor Paper – Cold Press 130#
  • Layering Weight Cardstock – Black, Lavender, Lime Green, Navy
  • Tim Holtz Ranger Distress Oxide – Ground Espresso, Dusty Concord, Black Soot, Seedless Preserves, Rusty Hinge
  • Hero Arts Hero Hues Pigment Ink – Unicorn
  • Copic – E79, E99, C9, YR14
  • Acrylic Paints: Mars Black & Titanium White
  • Lawn Fawn Stencil Paste – Clear
  • Studio Light Glow in the Dark Paste
  • Gina K Designs Glitz Glitter Gel – White
  • Tim Holtz Ranger Distress Spray Stain – Shaded Lilac
  • Tim Holtz Ranger Distress Mica Stain – Brushed Pewter, Black Soot
  • 1 5/8″ Stitched Circle Die

For the final video in my Halloween Series 2022 (check it out HERE ) I went out on a limb and tried out the new Tim Holtz Winter Frost Distress Mica Stain for the starry background in my Pumpkin House scene. I love how this looks! The night sky is filled with stars and gives a beautiful glow to the background in this card. The addition of Black Soot Spray Stain brings a subtle element of nighttime to the scene.

The whimsical colors I used for the pumpkin house add a Halloween feel to the this card but it could easily be used as a fall card. The cute little glowing mushrooms and shading on the flowering vines are perfect for autumn-themed cards! I also used a squeeze bottle to apply glow-in-the-dark dots to some elements in the card. It is a fun surprise that the recipient will enjoy.

I hope you have enjoyed this Halloween card series. I’m already hard at work designing some Thanksgiving goodies and I hope you will join me here in the coming weeks where I will link all details for these projects.

Cheers!

Cynthia