Materials List:
- Sizzix by Tim Holtz Pine Branches 3D Embossing Folder
- Gina K Designs Winter Wonderland Die Set
- Hero Arts Year Round Messages
- Hero Arts Hero Hues 111# Card Stock, 4 1/8″ x 5 3/8″ – Palm
- 135# Cold Press Watercolor Paper – 4″ x 5 1/4″
- A2 Card Base – Neenah Classic Crest Solar White, 5 1/2″ x 8 1/2″ flat
- Distress Embossing Glaze – Rustic Wilderness & Twisted Citron
- Distress Oxide Ink – Rustic Wilderness
- Distress Oxide Crayon – Fresh Balsam
- Watercolor Palette – Jazper Stardust, Cob Matte
- VersaMark Watermark Ink
- Detail Silver Embossing Powder
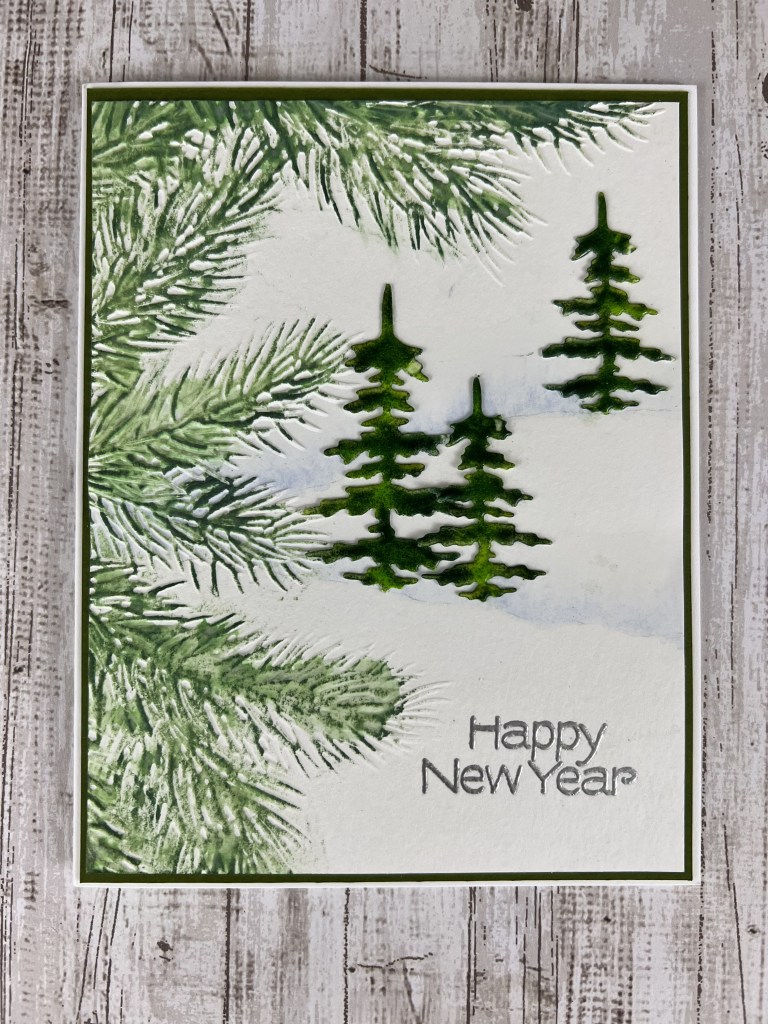
I have a few upcoming projects featuring glazed images – This is the first! I love the small, cool color palette on this card. It feels frosty! The YouTube video is here if you’d like to see more detail.
I started with the watercolor panel and lightly pencilled in two faint lines for hills, from approximately center left on the panel to the top 1/3 mark on the right and bottom 1/3 mark on the right (I refer to these as upper hill and lower hill.) I erased most of the pencil marks, leaving just enough to be able to see in order to add the watercolor. Using clean water and a #4 round watercolor brush I added a light layer of water along the top of each line, extending up approx an inch. *I created a very light wash and a darker wash of Cob Matte in my palette. I applied the lighter wash into the water line I created on the panel, allowing the color to blend with the water and start to spread up from the line. I added additional color along the lines until I had a shade that best resembled snow banks. Allow to dry. *Note: If you don’t have watercolor or don’t want to use watercolor for this step you could simply freehand some hillsides using paper templates, Distress Oxide Tumbled Glass ink and a blender brush. Apply lightly and build the color until you have a shade that you like!
Next I misted the back of the panel lightly with water and then placed it front side up in my Pine Branch embossing folder. The folder is larger than the panel, so I lined up the panel from the top left edge. I ran this sandwich through my Platinum 6 three times to get a good impression.
It isn’t necessary to create the trees next but I was excited to try the Rustic Wilderness/Twisted Citron color combo. I die cut three trees out of a cover-weight cardstock. Heavier is better when inking and heating up these images. I cut one large tree and two small trees from the set. I set up my work surface with a folded paper towel (where I’ll apply the embossing ink) and two sheets of copy paper that I folded and then opened flat (to catch the extra embossing glaze as I apply.) To glaze the trees I followed this process:
- Apply embossing ink to the entire front surface of the image, taking care to coat the tips of the branches
- Apply Twisted Citron Embossing Glaze along the center of the image, top to bottom
- Apply Rustic Wilderness Embossing Glaze to the outside edges, ensuring that the entire surface is covered with glaze.
- Heat the glaze with a heat tool until the glaze is shiny. Don’t overheat! If it bubbles it is too hot!
- Repeat this process to create two additional layers of glaze. On the 3rd layer you can fine-tune the light/dark ratio to create interesting highlight and shadow!
I set the trees aside to cool while I worked on the inking on the embossed area.
For the inking I started with the Fresh Balsam Distress Crayon. I used my finger to apply the ink along the center of each pine branch, avoiding the tips of the branches. Next I used the Rustic Wilderness ink pad to lightly color the raised image on the panel. Holding the ink pad parallel to the panel I lightly dragged the pad over the embossed area so that only the raised area was in contact with the pad. This takes a little practice! Rest assured that any small stray areas of ink can usually be removed with a Tombow Mono sand eraser. Finally I used some clean water, a paper towel and the tip of my finger to very gently tap a tiny amount of water over the inked area, again avoiding the tips of the branches. The object here is to start to blend the lighter green crayon ink with the darker green to create dimension. The lighter green ink starts to move down to the paper layer and the darker green softens but stays on the pine needles. It is a cool effect!
Next I placed the panel into my Misti and lined up the “Happy New Year” stamp on the bottom right side of the panel. I inked the stamp with VersaMark embossing ink and then applied the detail silver embossing powder. I heat-set the powder and it was time to assemble the card.
This card has two panels that layer onto the card base. There will be a 1/16″ border around each panel. I started by glueing the trees onto the panel; the large tree and one small tree on the lower hill and the other small tree on the upper hill near the right edge of the panel. I followed the contour of the hill when deciding on placement as it added a bit more realism. I glued this panel onto the Palm cardstock, again leaving a 1/16″ margin on all sides, and then glued this assembled piece to the card base. Card complete! This one came together very quickly so it is a great card for mass producing. You could even switch out the “Happy New Year” greeting for a “Thank You” and use this design for your holiday Thank You cards.
I hope your holiday season was wonderful. I’m looking forward to some Valentine’s Day design work in the coming weeks. Stay tuned!
Cheers!
Cynthia
