Materials List:
- Honey Bee Stamps Farmhouse Tree Stencil
- Honey Bee Stamps Scandinavian Christmas Stamps and Dies set
- Lawn Fawn Just Stitching Double Rectangle die set (embosses only, does not cut a frame)
- 140# coldpress watercolor paper
- Hero Arts Hero Hues 111# Cardstock – Cranberry
- 100# Kraft Cardstock
- Tim Holtz/Ranger Distress Oxide Inks – Rustic Wilderness, Faded Jeans, Aged Mahogany, Black Soot
- Twine
- Heart Embellishments
- Pops of Color – Pearl Satin
- Pearl Embellishments
I’m taking a little break from the inky night sky backgrounds to create a cute little farmhouse-y holiday card. The Honey Bee Stamps Farmhouse Tree Details stencil has been calling my name from the holiday stamps and dies bin for weeks now. And I’m super happy with the way this card (and all the other cards!) turned out. Yep, once I got started experimenting with the stencil and all the techniques for creating the inky layers it was very hard to call time. Here is the assortment of cards I created this weekend.

Normally when I am making cards for a video (see my YouTube video for this card here) I make a few and then decide which one “made the cut” for the video. I had a difficult time narrowing down the contestants this time. Ultimately all the other cards made a cameo appearance in the video because I fell in love with all of them. Here is how these cards were created, clockwise from top left.
Card #1: I wanted to use the star layers on the stencil so I went with an A7 card (5″ x 7″.) The tree layers were created with Distress Oxide Inks in Evergreen Bough and Pine Needles exactly as I show in the YouTube video that I linked above. Basically, just swatch some ink in a watercolor pan, spray on some water to create an inky watercolor concoction and start painting! The base layer is just the Evergreen Bough and the accent layer is Pine Needles. The base star layer is Distress Oxide in Fossilized Amber and the accent layer is Lawn Fawn Stencil Paste in Gold. I stenciled the wicker basket in with Aged Mahogany and then stenciled the accent layer on the basket with an off-white archival ink. I stenciled the dots and stars onto the tree with Picket Fence Studios Paper Glaze in Winter Snowfall. The sentiment is from Spellbinders Yana’s Christmas Sentiments foiling and die set. I used Spellbinders Bronze hot foil to foil the sentiment. All the cards panels were cut with Waffleflower A2 Layers dies and the double stitching on the front panel of cards 1, 3, 4 &5 was created using Lawn Fawn’s Just Stitching Double Rectangles dies.
Card #2: This card is basically the same as the card I created for the video with the exception of the embellishments. For the red berries in the garland I used the ball point of a ball stylus to stamp on the berries using Nuvo Glacier Paste in Haute Red. I also used the small pearl embellishments on the tree. The greeting is from the same Spellbinders set as in Card #1 and it is also foiled in bronze hot foil.
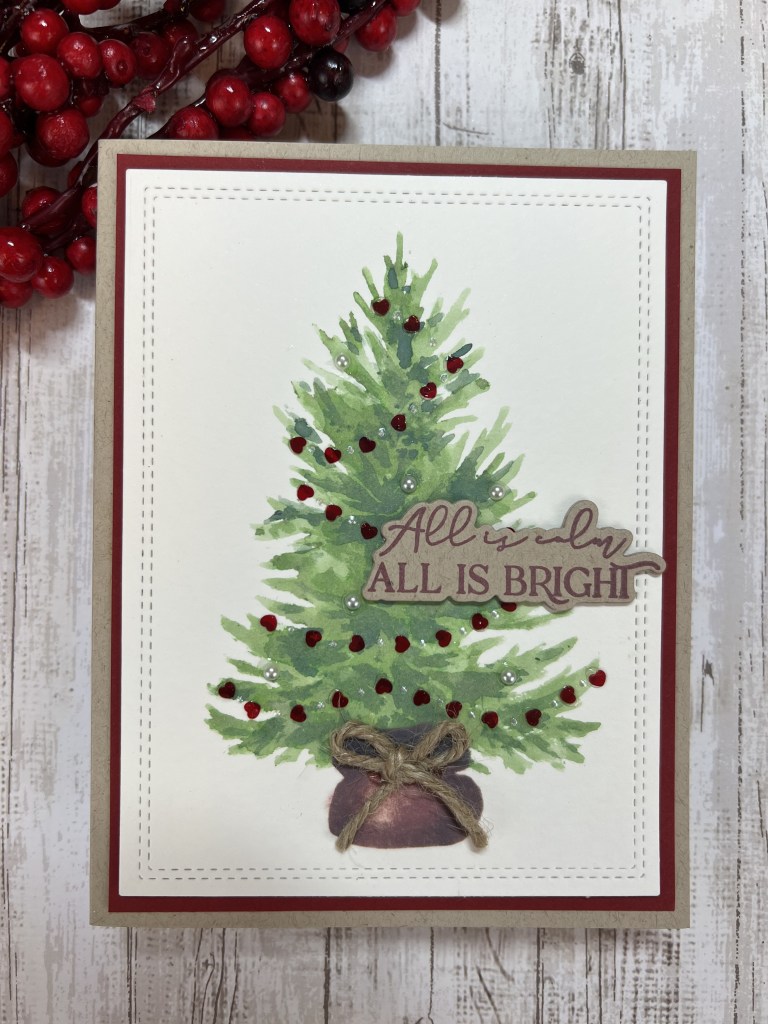
Card #3: This is the card from the YouTube video that I linked above. Briefly, the base layer of the tree is watercolor paper (4″ x 5 1/2″) on which I have painted the accent layer in Rustic Wilderness with a touch of Faded Jeans to deepen the green, and the burlap sack is Distress Oxide in Aged Mahogany with a touch of Black Soot to deepen the red. The embellishments on the tree are tiny hearts, tiny pearls and some drops of Pops of Color in Pearl Satin to mimic cranberry and popcorn garland. I adhered this watercolor paper layer to a Cranberry cardstock layer (4 1/8″ x 5 3/8″). The base cardstock is A2 Kraft cardstock, 100#. The little bow was created from jute (twine.) The greeting is from Honey Bee Stamps Scandinavian Christmas stamp and die set. It is stamped in Distress Oxide Aged Mahogany ink.
Card #4: This card is exactly the same as card #3 but I used a different sentiment from the Yana’s Christmas Sentiments. This is foiled with Bronze hot foil from Spellbinders. I used a tiny bit more Faded Jeans in the accent layer on the tree to deepen the green.
Card #5: For this card I decided to ink up the stencil with a blending brush and the same Distress Oxide inks as in card #3. For the accent layer I used the Altenew #5 blending brush (it is so small!) and it worked perfectly to pounce on the ink. The tree in this card is much more crisp and defined and it is a totally different look from the watercolor look of the other cards. I used Glossy Accents for the dots on the tree. Once this was dry I brushed on a tiny bit of Perfect Pearls in Gold to give the dots a little sparkle. I also decided to add a little snow to the bottom of the tree. Gina K Designs Glitz Glitter Gel was perfect for snow! Lastly I edged the tree panel with a small amount of Vintage Photo Distress Oxide to give the panel a bit of a rustic, vintage look. I love this card! Be sure to check out the video for all the details for card #3. I have at least one more holiday card coming up this week and then I will switch focus to a crafty mixed media gift project for my girls. I’ll create a post on this project after the holidays. Stay tuned!
Cheers!
Cynthia

I like the double stitching around the face of the cards. What die set did you use?
LikeLike
Hi Deb. That set is from Lawn Fawn. It is the Just Stitching Double Rectangle die set. It does not cut, it only embosses the double stitched rectangles. It’s still available at lawnfawn.com. Great set.
LikeLike