Materials List:
- Trinity Stamps Foiled Pine Foiling Plate & Die Set
- Hero Arts Joy Stamp & Die Set
- Hero Arts Hero Hues 111# Cardstock – Cranberry
- Distress Spray Stain – Antique Linen
- Distress Oxide Inks – Rustic Wilderness, Tumbled Glass, Vintage Photo
- Spellbinders Glimmer Foil – Aura
- Ranger/Wendy Vecchi Archival Ink – Potting Soil
- Liquitex – Crackle Paste
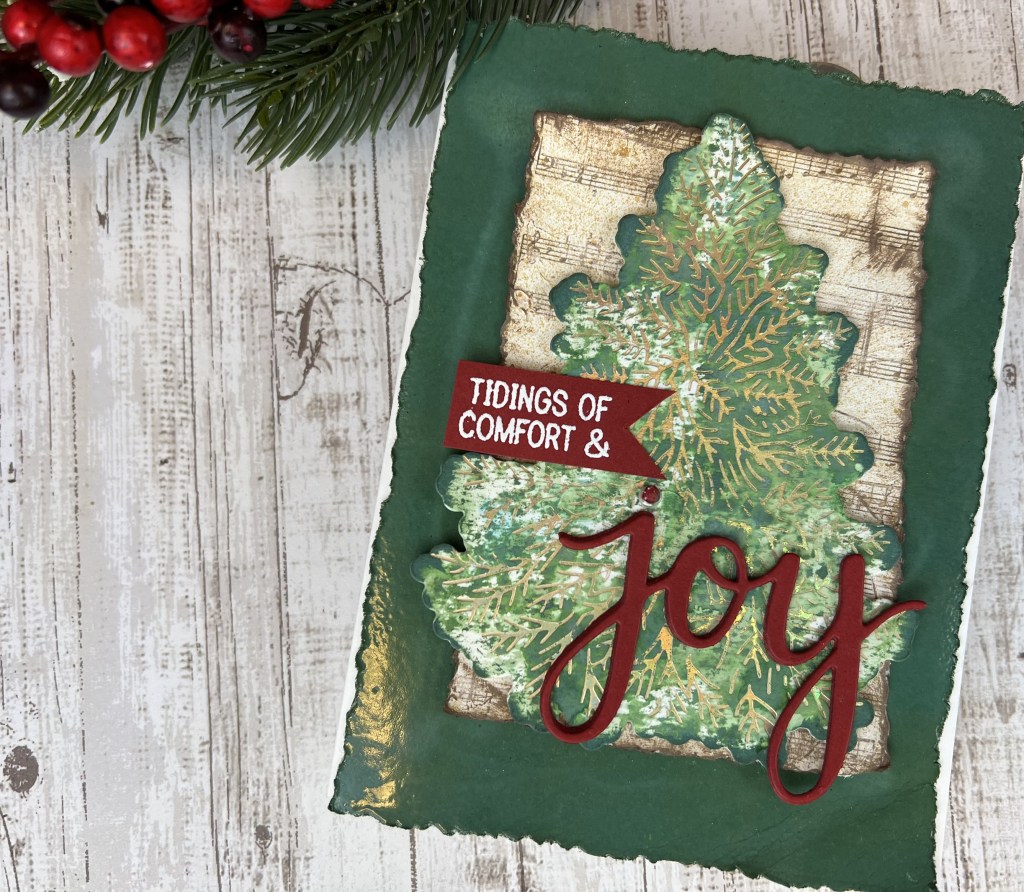
Reboot! For the record, I completely reworked a card that I posted here a few days ago. It was one of those cards…one where you like it but you don’t LOVE IT and it sort of sits in your thoughts until you go back to the craft table and take another look at it. The result is a lighter feel, cooler colors and a cool crackle paste/antiqued music layer that I really love.
This card was inspired by so many beautiful holiday mixed media Pinterest projects – I spent my design day trying out some techniques and adapting them to typical card making techniques. The result is this card of layered, stamped and embossed goodness. I am so enthralled with background stamping, covered by layers of semi-transparent ink and stenciling. Watch for many cards in the future that showcase these techniques. Meanwhile, check out the video for this card here.
I started with the top layer of the card (the tree layer) with 140# cold pressed watercolor paper. I created an ink puddle on my glass mat with Distress Oxide inks in Tumbled Glass and Rustic Wilderness. I pressed the watercolor paper into the ink (systematically?) to create the first layer of color. The Tumbled Glass acts as a highlight behind the darker Rustic Wilderness so this ink was applied sparingly. After drying this first layer I inked up the mat again with only Rustic Wilderness and a small amount of water to create a darker top layer of color. The idea here is to create a pattern of color that is the background for the foiling of the branches on the pine tree. This will make much more sense when you watch the video!
The next step is to die cut the tree shape with the included outline die. I lined up the outline die on the inked piece until I found just the right view and then ran the paper and die through my die cut machine. Next I created a foiling stack for my Glimmer machine using Spellbinders Aura Glimmer Foil. This foil is beautiful! In the video I describe it as a cross between gold and silver foil but more accurately it is a cross between gold and iridescent foil. I ran the stack through my die cut machine and the result was truly stunning.
Next I worked on the deckled edge paper for the music and embossed layers of the card. I traced faint pencil lines for two panels: 4 1/4″ x 5 1/2″ and 3″ x 4 1/4″. I used a deckle edge ruler to tear the paper along the pencil lines.
Using the smaller deckle edge paper I stamped the music block stamp onto the paper using Archival ink in Potting Soil. I then added a layer of Crackle Paste and allowed the piece to dry. Once dry I antiqued the panel by spraying lightly with Distress Spray Stain in Antique Linen, then used the Distress Oxide ink pad in Vintage Photo to lightly ink the edges and a few raised spots on the face of the panel. Panel complete!
The bottom layer starts with the 4″ x 5 1/4″ deckle edge panel. I inked up a “frame” on the front of the paper using Rustic Wilderness ink, heat-dried the ink, then applied a layer of embossing ink using an old ink pad that gets a lot of abuse. I applied clear embossing powder then heat set the powder. I repeated the embossing ink/embossing powder steps once more. So easy but so much shine to this layer!
For the greeting I chose Hero Arts’ Joy stamp and die set. The large greeting and die are perfect for this card. I chose a cranberry cardstock for the greeting and cut the “Joy” word three times for layering. I stamped the words “Tidings of comfort &” on cranberry cardstock, applied embossing ink and white embossing powder, then heat set. I cut the greeting into a banner shape. Whew! Finally all elements are ready to assemble the card.
For a card base I used a heavy white cardstock cut to 5 1/2″ x 8 1/2″, scored at 4 1/4″. I folded and pressed the scored edge and used a strong liquid adhesive to apply the glazed layer to the card base front. I did not apply adhesive near the edges of the glazed layer as I really love how this layer has so much dimension and curls up slightly on the edges. This adds to the mixed media look that I was going for with this card. I then added the music layer in the center of the glazed layer. The last layer, the tree was applied using foam squares for even more dimension. I finished off this card by adhering the greeting strip and “joy” die cut near the bottom of the foiled tree. I applied the dot over the “j” using a dot of Pops of Color rather than trying to glue together three small dots.
I really love the look of this card and am working on a snowflake version that might make it to video. So many ideas, so little time.
Cheers!
Cynthia
